

Troubleshooting GALE
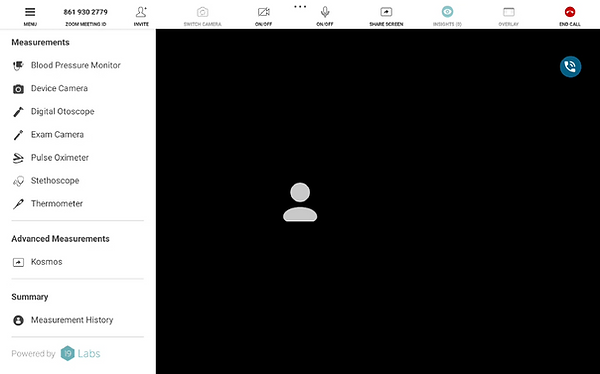
GALE Main Features Overview
Please refer to our Features Overview Document while we work to build out our features page. The topics below are troubleshooting common GALE issues
Basic Troubleshooting
If you notice strange behaviour on your GALE device (e.g., missing clinics, calls not going through, pages not loading etc.) go through these basic steps to try and resolve the issue. Quite often it's simple and can be easily resolved!
Synchronize GALE
-
Open GALE Settings
-
Press “Synchronize”
-
Restart the tablet
-
Note the toast message at the top
-
Please note: a successful sync will only occur if the device is connected to a good network. If your device is not syncing, try using another network or hotspot.
Restart Device
Hold down the power button and press “restart” or “reboot”
Check GALE Permissions
-
Open Android Settings - how to
-
Go to or Search “Apps”
-
Open GALE
-
Open "Permissions" - Ensure all permissions are allowed
-
Open "Display over other apps" - the toggle should be on
Check your network settings
Ensure GALE is connected to a network that follows all Network Requirements
Try on a hot spot
Putting GALE on a hot spot will eliminate any nuances with the local network and help narrow down if the network is an issue.
-
Enable Hotspot on your phone:
-
On Android: Go to Settings > Connections > Mobile Hotspot and Tethering, then toggle on Mobile Hotspot
-
On iPhone: Go to Settings > Personal Hotspot and toggle on "Allow Others to Join"
-
-
Find the Hotspot on GALE:
-
On the device you want to connect, go to Wi-Fi settings
-
Look for the name of the hotspot (which you can find on the device sharing the connection)
-
-
Connect to the Hotspot:
-
Open Android Settings - how to
-
Go to Wifi
-
Tap on the hotspot's name
-
If prompted, enter the password for the hotspot (which you can find on the phone or device sharing the connection)
-
-
Test the issue again while connected to the hotspot
-
If the issue is resolved, let your IT know something from your network may be affecting GALE functionality
-
If the issue is not resolved, submit a support ticket or contact 19Labs
-
How to get to Android Settings
Through GALE Settings
-
Open GALE Settings from either the bottom bar or the right Menu
-
Select "Wifi" or "Bluetooth" from the sidebar menu
Swipe down from the top right corner of the tablet
-
Swipe down from the top right corner of the tablet
-
Select the Settings cog icon
-
If you don't see the icon, swipe down again to expand the menu
Swipe up from the bottom right corner of the tablet
-
Swipe up from the bottom right corner of the tablet
-
Select the three lines icon
-
Look for settings in the open apps
If the GALE tablet is not responding
Press and Hold the Power Button
Press and hold the Power button for about 10–15 seconds (or until the screen goes dark and the device restarts). This method forces the tablet to restart and does not erase any data.
Force Restart Using the Power and Volume Buttons
If the above method doesn’t work...
-
Press and hold the Power button and the Volume Up button simultaneously for about 10–15 seconds.
-
Release the buttons once the tablet logo or boot screen appears.
Related Resources:
If the GALE application is misbehaving
If you notice strange behaviour on your GALE device (e.g., app won't progress past the black 19Labs launcher, clinics are missing, calls not going through, pages not loading etc.) go through the basic steps to try and resolve the issue. Quite often it's simple and can be easily resolved!
If you have tried those steps, try these more involved troubleshooting steps.
Force Stop GALE
-
Through Android Settings
-
Open Android Settings - how to
-
Go to or Search “Apps”
-
Open GALE
-
Press “Force Stop”
-
Press "Open" to launch it back up
-
-
From the app launcher
-
Swipe up from the bottom right corner of the tablet
-
Select the three lines icon
-
Look for GALE in the open apps
-
Swipe GALE up to close the app
-
Open GALE again
-
Press the circle icon from the bottom right Android navbar
-
Press the GALE app icon from the Android home screen
-
-
Reset the Internal Clock
-
Open Android Settings - how to
-
Search and select "Date & Time"
-
Validate:
-
Automatic Date and Time toggle is on
-
Automatic Time Zone toggle is on
-
The Clock in the top left is the exact time - even 1 minute off can cause issues
-
-
If unsure, toggle each Date & Time and Time Zone on and off
-
Restart the tablet
Related Resources:
Zoom Call Issues
If GALE keeps stopping each time you try and make a call
-
Follow basic troubleshooting steps
If it appears as if a call has gone through, but a provider isn't joining or has reported an issue
-
Check the Progress bar (image below)
-
Check and/or wait for Zoom Error messages
-
Ensure there are no issues on the Provider end
Call Progress bar
If the progress spinner doesn’t progress past the first step, "Connecting to the Zoom Meeting", the call hasn’t initialized. If the call has not been initialized, the call will not appear in the Call Center, and recipients will not receive a notification.
If the call does not proceed past the initial step within a few minutes, this most often indicates an issue with the network or a blip in the network when the call was made. Sometimes, if you have recently changed your network or started up your tablet, your tablet may take several minutes to fully connect to Zoom, even if other services appear to be working.
-
End the call and place the call again
-
End the call and the session, and place the call again
-
Sync, and restart the GALE tablet
-
Check that GALE is on the appropriate network
-
Check all network requirements


Not initialized
Initialized
Related Resources:
Zoom Error Messages
The following Zoom errors are most often due to a network with missing requirements, a temporary glitch in the network, or the internal clock being out of sync:
-
Failed to initialize Zoom SDK. Error 3, Internal error code: -1
-
Error: 3, Internal error code: 5003
-
Error: 5, Internal error code: 124
1. Follow basic troubleshooting steps
2. Determine if there is an error with the local network
-
Connect GALE to a Hot Spot
-
Enable Hotspot on your phone:
-
On Android: Go to Settings > Connections > Mobile Hotspot and Tethering, then toggle on Mobile Hotspot
-
On iPhone: Go to Settings > Personal Hotspot and toggle on "Allow Others to Join"
-
Find the Hotspot on GALE:
-
On the device you want to connect, go to Wi-Fi settings
-
Look for the name of the hotspot (which you can find on the device sharing the connection)
-
Connect to the Hotspot:
-
Open Android Settings - how to
-
Go to Wifi
-
Tap on the hotspot's name
-
If prompted, enter the password for the hotspot (which you can find on the phone or device sharing the connection)
-
-
-
If GALE can make a call on a Hot Spot - connect to a hotspot
-
There is likely an issue with the local network GALE was on previously
-
Ensure all networks have requirements met as per the GALE Network Requirements Document
-
-
If GALE cannot make a call on a Hot Spot
-
Open Android Settings - how to
-
Go to "Apps"
-
Open the Google Play Store
-
Search for Zoom
-
Install and open Zoom
-
Select “Join a Meeting”
-
Enter the meeting ID 920 920 1488
-
If the call goes through, end the call
-
Reset the internal clock and try again on GALE
-
-
If the call does not go through
-
Take note of any error messages
-
Escalate the issue to 19Labs Support
-
-
3. Reset the Internal Clock
- Open Android Settings - how to
-
Search and select "Date & Time"
-
Toggle each Date & Time and Time Zone off and back on
-
Restart the tablet
Related Resources:
Zoom screen sharing
How to share the screen
-
Tap any of the following
-
"Share Screen" on the top navigation
-
"Measurement History" in the Menu
-
"Go to Measurement page" on a specific sensor
-
-
Accept the screen recording
-
If there is just one option, select "Share now"
-
If there are multiple options
-
Select "Entire Screen" from the dropdown
-
Tap "Start"
-
-
-
Wait for the screen to share. This can take up to 10 seconds
If the screen won't share
-
Ensure you have selected "Entire screen" and not "A single app"
-
If you have accepted the screen share and the screen isn't switching
-
Wait - sometimes the screen takes up to 10 seconds to change
-
Ensure the green square is around the outside of the screen
- Ensure the screen share icons appear on the bottom left of the screen
-
- Try screen share again using the same method.
- Try screen share again using a different method.
- End the call and begin another call. Try screen share again.
If the screen is not switching, Zoom may not have completed the screen-share request. If everything is still working within Zoom (menu, measurements etc.) the app is not frozen, the screen has not completed the share.


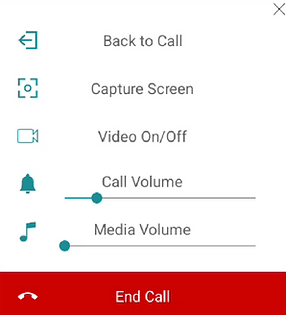
How to get back to Zoom
-
Open the back to Call Button
-
Tap "Back to Call"
-
The screen will automatically stop sharing and the video call will be displayed

Related Resources:
Zoom "Custom Streaming Service"
“Custom Streaming Service” Zoom message
This message will appear on Zoom for both the Provider (web or desktop app) and if you select GALE (menu > Apps). This is because of a feature added that, if configured, allows GALE to automatically record and upload the audio from the encounter.
NOTE: This is a configurable option. GALE will not record or upload any audio unless specified and configured to do so by a deployment administrator. Contact us to learn more about this option.


Related Resources:
Bluetooth devices won't connect
A single device won't connect
Ensure the Bluetooth device is paired
-
Open Android Settings - how to
-
Go to or search "Bluetooth"
-
Ensure the device is in pairing mode
-
Tap the device under "Available Devices" or "Pair New Device" or "More" etc.


No Bluetooth devices will connect
Check Location Services
-
Open Android Settings - how to
-
Go to or search "Location Services"
-
Ensure "Use Location" is toggled on


Related Resources:
Troubleshooting Bluetooth Keyboards
How to pair a Bluetooth keyboard
Ensure the Bluetooth keyboard is Paired
-
Open Android Settings - how to
-
Go to or search "Bluetooth"
-
Ensure the device is in pairing mode
-
Tap the device under "Available Devices" or "Pair New Device" or "More" etc.

The Bluetooth keyboard closes the GALE app
If every time you connect or use a Bluetooth keyboard the GALE application closes, check to ensure the keyboard is in "Tablet" mode.
-
Open Android settings
-
Go to or search "Pen and Keyboard"
-
Tap "Physical Keyboard"
-
Tap "System mode when a keyboard is connected"
-
Ensure “Tablet” is selected (and not PC mode)


Related Resources:
If GALE won't update


If GALE won't update because the Nine DPC is not responding
-
Exit the Nine DPC and go back to GALE
-
Open the Menu and then Dashboard
-
Hold your finger on the word "software" at the bottom of the dashboard
-
Open the Google Play Store from this debug page
-
Find and open "19Labs DPC"
-
Tap "Update"
-
When the update is finished, restart the tablet
-
When GALE launches, update again
-
If any issues remain, contact 19Labs or your Administrator