

CALLS
GALE Troubleshooting
Zoom Call Issues
If GALE keeps stopping each time you try to make a call
-
Follow basic troubleshooting steps
-
Try Zoom on another device on the same network
-
Start a new call or join a Zoom room
-
If the call does not go through, check your network
-
If the call does go through, continue with the following steps
-
If it appears as if a call has gone through, but a provider isn't joining or has reported an issue
-
Check the Progress bar (image below)
-
Check and/or wait for Zoom Error messages
-
Ensure there are no issues on the Provider end
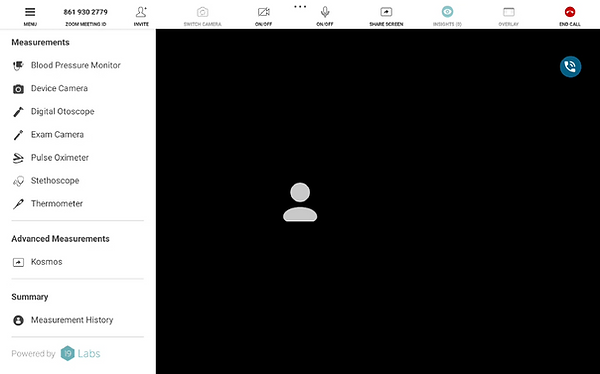
Call Progress bar
If the progress spinner doesn’t progress past the first step, "Connecting to the Zoom Meeting", the call hasn’t initialized. If the call has not been initialized, the call has not gone through, will not appear in the Call Center, and recipients will not receive a notification.
If the call does not proceed past the initial step within a few minutes, this most often indicates an issue with the network or a blip in the network when the call was made. Sometimes, if you have recently changed your network or started up your tablet, your tablet may take several minutes to fully connect to Zoom, even if other services appear to be working.
-
End the call and place the call again
-
End the call and the session, and place the call again
-
Sync, and restart the GALE tablet
-
Check that GALE is on the appropriate network
-
Check all network requirements


Not initialized
Initialized
Related Resources:
Zoom Error Messages
The following Zoom errors are most often due to a network with missing requirements, a temporary glitch in the network, or the internal clock being out of sync:
-
Failed to initialize Zoom SDK. Error 3, Internal error code: -1
-
Error: 3, Internal error code: 5003
-
Error: 5, Internal error code: 124
1. Follow basic troubleshooting steps
2. Determine if there is an error with the local network
-
Try on another network (e.g., Guest)
-
Open GALE Settings
-
Select “Wifi” from the left menu
-
Select a different network
-
-
Connect GALE to a Hot Spot
-
Enable Hotspot on your phone:
-
On Android: Go to Settings > Connections > Mobile Hotspot and Tethering, then toggle on Mobile Hotspot
-
On iPhone: Go to Settings > Personal Hotspot and toggle on "Allow Others to Join"
-
Find the Hotspot on GALE:
-
On the device you want to connect, go to Wi-Fi settings
-
Look for the name of the hotspot (which you can find on the device sharing the connection)
-
-
Connect to the Hotspot:
-
Open Android Settings - how to
-
Go to Wifi
-
Tap on the hotspot's name
-
If prompted, enter the password for the hotspot (which you can find on the phone or device sharing the connection)
-
Note: you may have to forget the network you are on, or the GALE tablet may try and connect to it again.
-
-
-
-
If GALE can make a call on a Hot Spot - connect to a hotspot
-
There is likely an issue with the local network GALE was on previously
-
Ensure all networks have requirements met as per the GALE Network Requirements Document
-
-
If GALE cannot make a call on a Hot Spot
-
Open Android Settings - how to
-
Go to "Apps"
-
Open the Google Play Store
-
Search for Zoom
-
Install and open Zoom
-
Select “Join a Meeting”
-
Enter the meeting ID 920 920 1488
-
If the call goes through, end the call
-
Reset the internal clock and try again on GALE
-
-
If the call does not go through
-
Take note of any error messages
-
Escalate the issue to 19Labs Support
-
-
3. Reset the Internal Clock
- Open Android Settings - how to
-
Search and select "Date & Time"
-
Toggle each Date & Time and Time Zone off and back on
-
Restart the tablet
Related Resources:
Inviting another participant to a Call
If you are on a call with a patient, there are several ways to invite another participant, such as a parent or specialist, to the call.
Invite through Zoom (GALE)
If a provider or participant has trouble joining the call, or if you need to add someone else (such as a provider, parent, specialist, or translator), you can send them a meeting link directly from the call screen.
-
Start or join a meeting.
-
Tap "Invite" on the top bar meeting controls.
-
Choose from the following invite options:
-
Email - sends a link through email
-
SMS - a direct link to the meeting
-
WhatsApp - a direct link to the meeting
-
Dial out - initiates a phone call that the participant can answer. Option to include an SMS or WhatsApp link with the phone call.
-
Please note that common channels are not secure. Ensure you have the intended participants' details correct before sending.
For security, the call link will become inactive immediately after the call has ended.


Zoom screen sharing
How to share the screen
-
Tap any of the following
-
"Share Screen" on the top navigation
-
"Measurement History" in the Menu
-
"Go to Measurement page" on a specific sensor
-
-
Accept the screen recording
-
If there is just one option, select "Share now"
-
If there are multiple options
-
Select "Entire Screen" from the dropdown
-
Tap "Start"
-
-
-
Wait for the screen to share. This can take up to 10 seconds
If the screen won't share
-
Ensure you have selected "Entire screen" and not "A single app"
-
If you have accepted the screen share and the screen isn't switching
-
Wait - sometimes the screen takes up to 10 seconds to change
-
Ensure the green square is around the outside of the screen
- Ensure the screen share icons appear on the bottom left of the screen
-
- Try screen share again using the same method.
- Try screen share again using a different method.
- End the call and begin another call. Try screen share again.
If the screen is not switching, Zoom may not have completed the screen-share request. If everything is still working within Zoom (menu, measurements etc.) the app is not frozen, the screen has not completed the share.


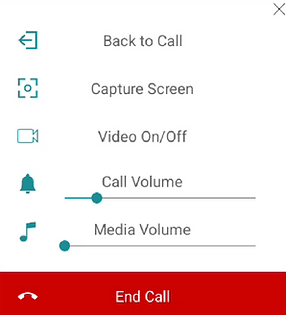
How to get back to Zoom
-
Open the back to Call Button
-
Tap "Back to Call"
-
The screen will automatically stop sharing and the video call will be displayed

Related Resources:
Zoom Green Screen
Rarely, the screen may be green when starting a Video call. This is a timing issue and is most often resolved with a new call. This issue will not resolve on its own, and a call end and restart is required. We are working on resolving this issue permanently.
If the screen is Green
-
End the call immediately
-
Place a new call on the same clinic


Zoom "Custom Streaming Service"
Update: This message has been removed for the 1.20.7 release update unless the streaming service has been enabled for your deployment
“Custom Streaming Service” Zoom message
This message may appear on Zoom for both the Provider (web or desktop app) and if you select GALE (menu > Apps). This is because of a feature added that, if configured, allows GALE to automatically record and upload the audio from the encounter.
NOTE: This is a configurable option. GALE will not record or upload any audio unless specified and configured to do so by a deployment administrator. Contact us to learn more about this option.


