

Reports
Reports
GALE Reports Overview
Use reports to remotely track activity, identify trends, and measure impact across all deployments. Go to identity.19labs.com/login/rp to view your deployment activity now!
Report Types
What is a Usage report?
A "usage report" indicates all usage that occurred on each selected device within a specified time period. The usage report includes: success and failure numbers for calls, sensors, and logins, session totals, forms submitted, prescriptions created, and more...
What is a Calls report?
A "calls report" is a detailed list of all the calls that occurred on each selected device within a specified time period. The calls report includes: clinic name, start time, duration, wait time, status (complete, cancelled, interrupted), number of participants, and provider name for billing purposes.
What is a Forms report?
A "forms report" is a detailed list of all the forms that were interacted with on each selected device within a specified time period. The forms report includes: form name, submitted time, and the form status (continue, finish & save, cancelled, external form).
What is an Ops report?
An "ops report" or "operations report" returns technical data for each selected device at the time of the report. The ops report includes: serial number, activation date, software version, Android details, manufacturer details, and when the device was last seen by the Deployment software.
What is an Events report?
An "events report" returns technical data for each selected device within a specified time period. Each event is a details snapshot of what happened during the session of the timestamp defined.
What is an Adverse report?
An "adverse report" indicates all adverse events reported on each selected device within a specified time period. The adverse report includes: crashes, fatal errors, network latency, disconnects from Proxy, and server interruptions.
Go to: How to run a report

How to run Reports
Devices on a single deployment
Gain insights into a single deployment by remotely tracking activity, identifying trends, measuring impact, and troubleshooting.
-
Log in to the reports portal at identity.19labs.com/login/rp
-
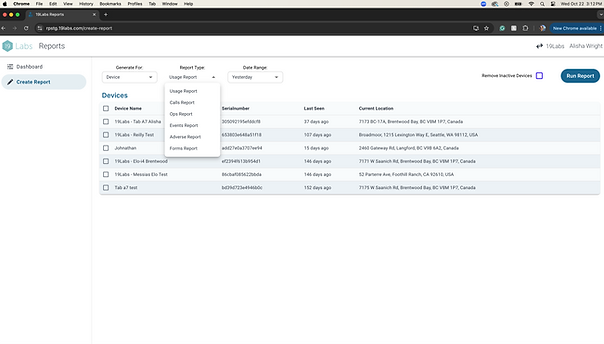
Select "Create Report"
-
Generate for is "Devices" by default
-
Note: if you manage only 1 Deployment, this option may be hidden.
-
-
Report type is "Usage Report" by default.
-
Select the appropriate option from the dropdown:
-
Usage
-
Calls
-
Ops
-
Events
-
Adverse
-
Forms
-
-
-
Date range is "Yesterday" by default
-
Select the appropriate date range from the dropdown
-
-
Select "Remove Inactive Devices" if desired
-
Select "Run Report"
-
Options for the report once it's run
-
Sort the columns by clicking on the column title
-
Export the report as a CSV and upload it where desired
-
Copy and paste straight from reports into a formatted spreadsheet
-
Multiple deployments at the same time - NEW!
If you manage multiple deployments, you may run them all at once using the "Careprovider" option in the "Generate For" dropdown. This will return a report with device usage from every device on every selected Care Provider.
-
Log in to the reports portal at identity.19labs.com/login/rp
-
Select "Create Report"
-
Generate for is "Devices" by default. Select "Careprovider" from the dropdown
-
Note: if you manage only 1 Deployment, this option may be hidden. See Devices on a single deployment for more options
-
-
Select Care Providers for the report
-
Individual Care Providers: use the checkbox beside the device name
-
All Care Providers: use the checkbox at the top to select all
-
Note: Every device will be reported on from each selected Care Provider.
-
-
Report type is "Usage Report" by default.
-
Select the appropriate report option from the dropdown
-
-
Date range is "Yesterday" by default
-
Select the appropriate date range from the dropdown
-
-
Select "Run Report"
-
Options for the report once it's run
-
Sort the columns by clicking on the column title
-
Export the report as a CSV and upload it where desired
-
Copy and paste straight from reports into a formatted spreadsheet
-


How to save a Report
Saving a report setting
If you find yourself creating the same report every day (e.g., Usage report for Yesterday) you can save these report settings for quick and easy access.
-
Log in to the reports portal at identity.19labs.com/login/rp
-
Select "Create Report"
-
Generate for is "Devices" by default. Select "Careprovider" if appropriate.
-
Note: if you manage only 1 Deployment, this option may be hidden.
-
-
Report type is "Usage Report" by default.
-
Select the appropriate option from the dropdown:
-
Usage
-
Calls
-
Ops
-
Events
-
Adverse
-
Forms
-
-
-
Date range is "Yesterday" by default
-
Select the appropriate date range from the dropdown
-
-
Select "Remove Inactive Devices" if desired
-
Select "Run Report"
-
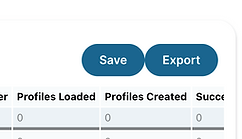
Select "Save Report"
-
Give the report a meaningful name. E.g., Usage report - Yesterday


How to use a saved Report
Saving a report setting
If you find yourself creating the same report every day (e.g., Usage report for Yesterday) you can save these report settings for quick and easy access.
-
Log in to the reports portal at identity.19labs.com/login/rp
-
From the Dashboard, select your saved report from the list
That's it! The report will run with the settings that were saved.


How to export a Report
Export a report
If you would like to save a report, there are a few ways to do this.
-
Run the report - how to
-
Export the report
-
Option 1: Click the "Export" button on the top right of the report
-
This will export a CSV file
-
You can open this in your preferred spreadsheet program (Excel, Google Sheets etc.)
-
-
Option 2: Copy the report directly from the page into your preferred spreadsheet program
-
-
In your preferred program, use conditional formatting, filters, and other visual queues to call out specific information
.png)
.png)